
Showing posts with label Holidays. Show all posts

Red-Wine-Braised Short Ribs

Friday, December 22, 2023

 October 2011 Issue
 AND 
4.2 ***** (2976 Ratings)


  • ACTIVE TIME

    25 minutes

  • TOTAL TIME

    3 hours 35 minutes

This braised short ribs recipe has fans. “This has been my go-to recipe for short ribs for as long as I can remember,” says one commenter, “it never fails.” It’s an ideal dish for entertaining since short ribs are even better when allowed to rest overnight to reheat the following day.

The cooking method is simple, building flavor with each step: Start by heading to a butcher and ask them to cut bone-in short ribs (which have more flavor than boneless short ribs) into 2" pieces. Using a Dutch oven, sear them in batches until cooked on all sides. When you pour off the fat, take care not to lose the browned bits stuck to the bottom of the pan, which will add even more flavor. Next, sauté some aromatic vegetables in the residual drippings, then toast the tomato paste and flour, which will add a depth of flavor and viscosity to the braise. After deglazing with the red wine (scrape up those browned bits so they dissolve), you’ll simmer the meat on the stovetop for a bit before tucking in lots of garlic and fresh herbs, dousing the whole thing with beef broth, and sliding the braise into the oven.

The long cook time transforms the braising liquid into a rich sauce and the short ribs into fall-off-the-bone tender chunks. Transfer the meat to a platter and strain the sauce, skimming the fat that rises to the top. Serve with mashed potatoescreamy polenta, plush Parker House rolls, or wide ribbons of pasta, so none of that sauce goes to waste.

6 servings

5

lb. bone-in beef short ribs, cut crosswise into 2" pieces

Kosher salt and freshly ground black pepper

3

Tbsp. vegetable oil

3

medium yellow onions, chopped

3

medium carrots, peeled, chopped

2

celery stalks, chopped

3

Tbsp. all-purpose flour

1

Tbsp. tomato paste

1

750-ml bottle dry red wine (preferably Cabernet Sauvignon)

10

sprigs flat-leaf parsley

8

sprigs freesh thyme

4

sprigs fresh oregano

2

sprigs fresh rosemary

2

fresh or dried bay leaves

1

head of garlic, halved crosswise

4

cups low-sodium beef stock

Preparation

  1. Step 1

    Preheat oven to 350°. Season short ribs with salt and pepper. Heat oil in a large Dutch oven over medium-high. Working in 2 batches, brown short ribs on all sides, about 8 minutes per batch. Transfer short ribs to a plate. Pour off all but 3 Tbsp. drippings from pot.

    Step 2

    Add onions, carrots, and celery to pot and cook over medium-high heat, stirring often, until onions are browned, about 5 minutes. Add flour and tomato paste; cook, stirring constantly, until well combined and deep red, 2–3 minutes. Stir in wine, then add short ribs with any accumulated juices. Bring to a boil; lower heat to medium and simmer until wine is reduced by half, about 25 minutes. Add all herbs to pot along with garlic. Stir in stock. Bring to a boil, cover, and transfer to oven.

    Step 3

    Cook until short ribs are tender, 2–2½ hours. Transfer short ribs to a platter. Strain sauce from pot into a measuring cup. Spoon fat from surface of sauce and discard; season sauce to taste with salt and pepper. Serve in shallow bowls over mashed potatoes with sauce spooned over. 

  2. https://www.bonappetit.com/recipe/red-wine-braised-short-ribs

    Editor’s note: This recipe was first printed in our October 2011 issue; head this way for more of our favorite comfort foods →
Nutrition Per Serving

One serving contains: Calories (kcal) 566.1 %Calories from Fat 53.5 Fat (g) 33.8 Saturated Fat (g) 11.8 Cholesterol (mg) 131.8 Carbohydrates (g) 13.5 Dietary Fiber (g) 2.7 Total Sugars (g) 7.2 Net Carbs (g) 10.8 Protein (g) 48.2 Sodium (mg) 136.5


Gourmet’s Best Gingerbread Cookies

Monday, December 12, 2022


  • Active Time

    50 minutes (not including decorating)

  • Total Time

    2 hours 15 minutes

Is there anything more comforting at the holidays than curling up by the fire with a gingerbread cookie and a warm cup of tea? (Laughing with family and friends around a plate of decorated sugar cookies runs a close second.) Whether you want to make gingerbread people, snowflakes, candy canes, ornaments—or even skeletons for Halloween—this Gourmet classic should be your go-to.

For this old-fashioned gingerbread cookie recipe, you’ll boil the spices with molasses and brown sugar to bloom their flavor. Then you’ll make the cookie dough right in the saucepan by adding in baking soda, cold butter (to bring down the temperature of the mixture), an egg, and the dry ingredients. There’s no baking powder here, which means your gingerbread men will keep their shape. If your dough feels too soft to work with easily, you can refrigerate it for 30 minutes to an hour; alternatively, if you want to make the cookie dough ahead of time, refrigerate it up to three days ahead and let it sit out at room temperature for 20 to 30 minutes to soften before rolling.

The cook time on these cutout cookies will vary depending on the size cutters you use, so keep a close eye on them. To mitigate burning, line your cookie sheets with parchment paper.

The decorating icing in this recipe is optional, but it’s a great upgrade from plain powdered sugar glaze. It’s a variation of royal icing that incorporates lemon juice, vanilla extract, and powdered egg whites, the last of which helps to stabilize the icing and gives it a polished, matte appearance when dry.

Editor’s note: This recipe makes a soft gingerbread cookie with a slightly crispy exterior. For a cookie with more crunch, look to these gingersnaps. Or, if you love chewy gingerbread, consider making these spiced brownies. Is a gingerbread house more your style? We dare you to try your hand at this cardamom-spiced Mid-Century masterpiece.

Ingredients

Makes about 4 dozen cookies

Gingerbread cookies:

⅔ cup molasses (not robust)
⅔ cup packed dark brown sugar
1 Tbsp. ground ginger
1½ tsp. ground cinnamon
½ tsp. ground allspice
½ tsp. ground cloves
2 tsp. baking soda
2 sticks (1 cup) unsalted butter, cut into 16 pieces
1 large egg, lightly beaten
3¾ to 4 cups all-purpose flour
½ tsp. kosher salt

Decorating icing and assembly:

1 (1 lb.) box powdered sugar
4 tsp. powdered egg whites (not reconstituted)
1 Tbsp. fresh lemon juice
1 tsp. vanilla extract
Gel food coloring (optional)
Sprinkles, dragées, and sanding sugar, for decorating
Special Equipment: Rolling pin; assorted 2- to 3-inch cookie cutters (in shapes such as people, snowflakes, candy canes, etc.); a metal offset spatula; a pastry bag fitted with ⅛- to ¼-inch plain tip (optional)
  1. Gingerbread cookies:

    Step 1

    Bring molasses, brown sugar, and spices to a boil in a 4- to 5-quart heavy saucepan over moderate heat, stirring occasionally, and remove from heat. Stir in baking soda (mixture will foam up), then stir in butter 3 to 4 pieces at a time, letting each addition melt before adding next, until all butter is melted. Add egg and stir until combined, then stir in 3¾ cups flour and salt.

    Step 2

    Preheat oven to 325°F.

    Step 3

    Transfer dough to a lightly floured surface and knead, dusting with as much of remaining ¼ cup flour as needed to prevent sticking, until soft and easy to handle, 30 seconds to 1 minute. Divide dough in half, then wrap one half in plastic wrap and keep at room temperature.

    Step 4

    Roll out remaining dough into a 14-inch round (⅛-inch thick) on a lightly floured surface. Cut out as many cookies as possible with cutters and carefully transfer with offset spatula to 2 buttered large baking sheets, arranging them about 1 inch apart.

    Step 5

    Bake cookies in upper and lower thirds of oven, switching position of sheets halfway through baking, until edges are slightly darker, 10 to 12 minutes total (watch carefully toward end of baking; cookies can burn easily). Transfer cookies to wire racks to cool completely. Make more cookies with remaining dough and scraps (reroll once).

  2. Decorating icing and assembly:

    Step 6

    Beat together the powdered sugar, powdered egg whites, lemon juice, vanilla extract, and ⅓ cup water in a large bowl with an electric mixer at moderate speed until just combined, about 1 minute. Increase speed to high and beat icing, scraping down side of bowl occasionally, until it holds stiff peaks, about 3 minutes in a standing mixer or 4 to 5 minutes with a handheld.

    Note: If you plan to spread (rather than pipe) icing on cookies, stir in more water, 1 teaspoon at a time, to thin to desired consistency.

    Step 7

    If using food coloring, transfer ¼ cup icing to a small bowl for each color and tint to desired shade. Spoon icing into a pastry bag (if using), pressing out excess air, and snip a ⅛-inch opening in corner of bag. Twisting bag firmly just above icing, decoratively pipe icing onto cookies. Decorate with sprinkles, sanding sugar, and dragées, if using. Let icing dry completely (about 1 hour) before storing cookies. 

    Do ahead: Gingerbread cookies keep in an airtight container at room temperature 3 weeks.

    Editor's note: This recipe was originally printed in the December 2002 issue of ‘Gourmet’ as Gingerbread Snowflakes and first appeared online in August 2004. Head this way for more of our best Christmas cookies 

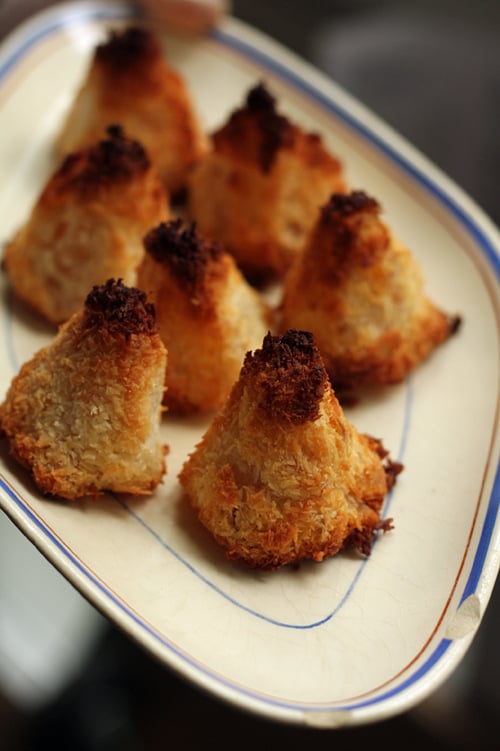
Pineapple-Coconut Macaroons

Thursday, December 23, 2021


Pineapple-Coconut Macaroons - David Lebovitz
About 35 cookies
 

Once baked, the nicely browned cookies will have a delightfully crackly crust. But the inside remains soft and slightly sweet, thanks to the bits of caramelized pineapple tucked inside. So be sure to cook them so they are entirely browned all the way up the sides.

pineapple-coconut macaroons


I prefer to use unsweetened pineapple packed in its own juice, but if you can only find pineapple packed in light syrup, reduce the amount of sugar to 3/4 cup (150 g) for caramelizing the pineapple. If you want to use fresh pineapple, you’ll need 1 1/4 cups of caramelized crushed pineapple paste.
One 20 ounce can (about 600g) crushed unsweetened pineapple
1 cup (200g) sugar
pinch of salt
3 1/2 cups (245g) dried unsweetened shredded coconut
3  large egg whites
1/2 teaspoon vanilla extract
1. Put the pineapple in a wide skillet (preferable nonstick) with the sugar and a pinch of salt.

2. Cook the pineapple until the liquid is evaporated, then continue to cook, stirring constantly, until the pineapple gets thick and sticky, and just begins to brown. Remove from heat and scrape the caramelized pineapple into a large bowl. Then mix in the coconut into the pineapple, then the egg whites and vanilla.
(The mixture may be rather difficult to mix with a spatula. You can mix it with a stand mixer fitted with the paddle attachment or use your clean hands.. No need to  beat the egg whites.  Just mix it in).  Readers recommend adding rum or soaking the pineapple in pina~colada)

3. Preheat the oven to 350ºF (180ºC). Line a baking sheet with parchment paper.

4. Use your hands to gather a bit of the batter, about the size of an unshelled walnut, and form it into a round or a pyramid-like shape, onto the prepared baking sheet. Continue forming all the cookies then bake them for about 30 minutes, rotating the baking sheet midway during baking. The cookies are done when they are nicely browned up the sides.

Storage: These cookies are best served the day they’re made, since over time, they’ll lose their slightly crunchy crusts. You can store the batter up to five days in the refrigerator and bake them off as desired.

Notes: Unsweetened coconut is available in shops that specialize in ethnic ingredients and in natural food stores. It’s also available online on Amazon.

I’ve not tried this recipe using sweetened coconut flakes since it often contains additives and preservatives. So do try to seek out unsweetened shredded coconut, which is sometimes called dessicated coconut.

Eagle-eyed readers will note that I baked these on foil, since I was using a kitchen that wasn’t mine. You can use it as well, although I prefer parchment paper.


Orange Cranberry Oatmeal Cookies

 Makes about 7 dozen cookies

1 cup dried cranberries
3/4 cup old-fashioned rolled oats
1 1/2 teaspoons freshly grated orange zest
1/2 preparedBasic Butter Cookie Dough at room temperature
about 1/2 cup sugar

Step 1

In a bowl soak cranberries in warm water to cover 15 minutes. Drain cranberries well and chop fine.

Step 2

Preheat oven to 350°F.

Step 3

In bowl of a standing electric mixer beat cranberries, oats, and zest into basic dough until just combined well. Form dough into 1-inch balls and roll balls in sugar to coat. Arrange balls 2 inches apart on baking sheets and flatten to 2-inch rounds with bottom of a glass wrapped in wax paper to prevent sticking.

Step 4

Bake cookies in batches in middle of oven until pale golden, about 12 minutes, and cool on racks. Cookies may be stored between layers of wax paper in airtight containers up to 6 weeks frozen.