Pineapple-Coconut Macaroons

Thursday, December 23, 2021


Pineapple-Coconut Macaroons - David Lebovitz
About 35 cookies
 

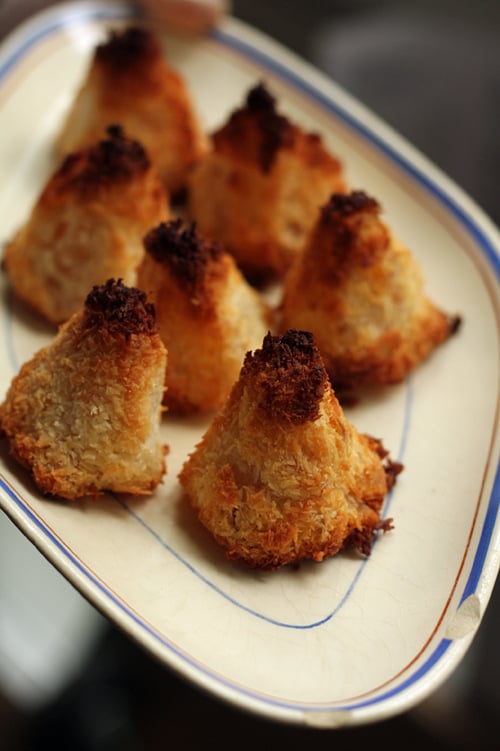
Once baked, the nicely browned cookies will have a delightfully crackly crust. But the inside remains soft and slightly sweet, thanks to the bits of caramelized pineapple tucked inside. So be sure to cook them so they are entirely browned all the way up the sides.

pineapple-coconut macaroons


I prefer to use unsweetened pineapple packed in its own juice, but if you can only find pineapple packed in light syrup, reduce the amount of sugar to 3/4 cup (150 g) for caramelizing the pineapple. If you want to use fresh pineapple, you’ll need 1 1/4 cups of caramelized crushed pineapple paste.
One 20 ounce can (about 600g) crushed unsweetened pineapple
1 cup (200g) sugar
pinch of salt
3 1/2 cups (245g) dried unsweetened shredded coconut
3  large egg whites
1/2 teaspoon vanilla extract
1. Put the pineapple in a wide skillet (preferable nonstick) with the sugar and a pinch of salt.

2. Cook the pineapple until the liquid is evaporated, then continue to cook, stirring constantly, until the pineapple gets thick and sticky, and just begins to brown. Remove from heat and scrape the caramelized pineapple into a large bowl. Then mix in the coconut into the pineapple, then the egg whites and vanilla.
(The mixture may be rather difficult to mix with a spatula. You can mix it with a stand mixer fitted with the paddle attachment or use your clean hands.. No need to  beat the egg whites.  Just mix it in).  Readers recommend adding rum or soaking the pineapple in pina~colada)

3. Preheat the oven to 350ºF (180ºC). Line a baking sheet with parchment paper.

4. Use your hands to gather a bit of the batter, about the size of an unshelled walnut, and form it into a round or a pyramid-like shape, onto the prepared baking sheet. Continue forming all the cookies then bake them for about 30 minutes, rotating the baking sheet midway during baking. The cookies are done when they are nicely browned up the sides.

Storage: These cookies are best served the day they’re made, since over time, they’ll lose their slightly crunchy crusts. You can store the batter up to five days in the refrigerator and bake them off as desired.

Notes: Unsweetened coconut is available in shops that specialize in ethnic ingredients and in natural food stores. It’s also available online on Amazon.

I’ve not tried this recipe using sweetened coconut flakes since it often contains additives and preservatives. So do try to seek out unsweetened shredded coconut, which is sometimes called dessicated coconut.

Eagle-eyed readers will note that I baked these on foil, since I was using a kitchen that wasn’t mine. You can use it as well, although I prefer parchment paper.


Orange Cranberry Oatmeal Cookies

 Makes about 7 dozen cookies

1 cup dried cranberries
3/4 cup old-fashioned rolled oats
1 1/2 teaspoons freshly grated orange zest
1/2 preparedBasic Butter Cookie Dough at room temperature
about 1/2 cup sugar

Step 1

In a bowl soak cranberries in warm water to cover 15 minutes. Drain cranberries well and chop fine.

Step 2

Preheat oven to 350°F.

Step 3

In bowl of a standing electric mixer beat cranberries, oats, and zest into basic dough until just combined well. Form dough into 1-inch balls and roll balls in sugar to coat. Arrange balls 2 inches apart on baking sheets and flatten to 2-inch rounds with bottom of a glass wrapped in wax paper to prevent sticking.

Step 4

Bake cookies in batches in middle of oven until pale golden, about 12 minutes, and cool on racks. Cookies may be stored between layers of wax paper in airtight containers up to 6 weeks frozen.

Oatmeal Cookies


  • Prep Time

    25 minutes

  • Total Time

    35 minutes

This is a no-nonsense chewy oatmeal cookie recipe. It’s not an oatmeal raisin cookie recipe. There are no cranberries or chocolate chips, no pecanspeanut buttercoconut, or any other add-ins, either (not even dates)—nothing that could divert attention from the buttery comfort of this classic cookie.

Old-fashioned oats—not quick oats—give these favorite cookies just the right chewy texture, while vanilla extract and ground cinnamon lend them the warmth and spice that’ll keep you coming back to the cookie platter for more. Soften your butter to room temperature, and make sure your eggs are at room temperature, too, so that they blend easily into the cookie dough. Doing some last minute baking? Here’s how to soften butter quickly.

The best oatmeal cookies are evenly sized (so they bake evenly) and perfectly round, so it’s ideal to use a #70 sized cookie scoop to portion the cookie dough into tablespoon-size balls. Place the dough balls at least 2 inches apart on parchment paper–lined cookie sheets since they’ll spread as they bake.

Editor's note: This recipe was originally published in the September 1999 issue of ‘Gourmet’ and first appeared online on August 20, 2004.

Ingredients

Makes 24 cookies

1¾ cups old-fashioned rolled oats
¾ cup all-purpose flour
¾ teaspoon cinnamon
½ teaspoon baking soda
½ teaspoon salt
1¼ sticks unsalted butter, softened
⅓ cup packed light brown sugar
⅓ cup granulated sugar
1 large egg
½ teaspoon vanilla

Step 1

Preheat oven to 375°F. Grease and line 2 baking sheets with parchment.

Step 2

Stir together oats, flour, cinnamon, baking soda, and salt in a medium bowl. Beat together butter, brown sugar, and granulated sugar in a stand mixer or in large bowl with a hand mixer until light and fluffy. Add egg and vanilla and beat until combined well. Add flour mixture and beat until just combined.

Step 3

Drop dough by heaping tablespoons 2 inches apart onto prepared baking sheets and flatten mounds slightly with moistened fingers. Bake cookies in upper and lower thirds of oven, switching position of sheets halfway through baking, until golden, about 12 minutes total. Transfer to wire racks to cool.


Ingredients

Makes 16

cups (200 g) all-purpose flour (spooning into measuring cups, then leveling)

tsp. (4 g) Diamond Crystal or ¾ tsp. (4 g) Morton kosher salt

¾

tsp. (4 g) baking soda

¾

cup (1½ sticks; 169 g) unsalted butter, divided

1

cup (200 g) (packed) dark brown sugar

¼

cup (50 g) granulated sugar

1

large egg

2

large egg yolks

2

tsp. vanilla extract

6

oz. (170 g) bittersweet chocolate (60%–70% cacao), coarsely chopped, or semisweet chocolate chips

Preparation

Step 1

Place racks in upper and lower thirds of oven; preheat to 375°. Whisk flour, salt, and baking soda in a small bowl; set aside.

Step 2

Cook ½ cup (1 stick; 113 g) butter in a large saucepan over medium heat, swirling often and scraping bottom of pan with a heatproof rubber spatula, until butter foams, then browns, about 4 minutes. Transfer butter to a large heatproof bowl and let cool 1 minute. Cut remaining ¼ cup (½ stick; 56 g) butter into small pieces and add to brown butter (it should start to melt but not foam and sizzle, so test with one piece before adding the rest).

Step 3

Once butter is melted, add both sugars and whisk, breaking up any clumps, until sugar is incorporated and no lumps remain. Add egg and egg yolks and whisk until sugar dissolves and mixture is smooth, about 30 seconds. Whisk in vanilla. Using rubber spatula, fold reserved dry ingredients into butter mixture just until no dry spots remain, then fold in chocolate (the dough will be soft but should hold its shape once scooped; if it slumps or oozes after being scooped, stir dough back together several times and let rest 5–10 minutes until scoops hold their shape as the flour hydrates).

Step 4

Using a 1½-oz. scoop (3 Tbsp.), portion out 16 balls of dough and divide between 2 parchment-lined rimmed baking sheets. Bake cookies, rotating sheets if cookies are browning very unevenly (otherwise, just leave them alone), until deep golden brown and firm around the edges, 8–10 minutes. Let cool on baking sheets.

Do Ahead: Cookies can be made 3 days ahead. Store airtight at room temperature.


TIPS:


Chris, oh Chris: I’ve said this countless times but you are my Favorite at BA (sorry!). Master of flavors and technique: your instructions are always so simple, straightforward, and the final product, always Amazing. Make sure you brown the butter. It took me double the amount of time to brown. After adding the rest of the cut up butter, you have to let the batch of butter cool Completely which takes some time, meaning it can’t be warm! Use high quality baking chocolate and 9 mins in the oven, my cookies came out perfect. I didn’t chill my dough as it retained its shape. My only regret: halving the ingredients and not making the full batch of 16 cookies. I made exactly 8 perfectly sized cookies-highly recommended!

Seared Lamb Shoulder Chops with Mustard- Dill Pan Sauce

Monday, November 15, 2021

By Liz Pearson Fine Cooking Issue 107

Servings: four.

The sauce is the real star here, so feel free to substitute pork chops or chicken breasts if you don’t have lamb; the sauce is equally delicious on both.

Ingredients

4 bone-in lamb shoulder chops (2 to 2-1/2 lb. total) Kosher salt and freshly ground black pepper
1 Tbs. extra-virgin olive oil
2 small shallots, finely chopped

1/2 cup lower-salt chicken broth 1/2 cup dry white wine
1 Tbs. Dijon mustard

2 tsp. fresh lemon juice
2 Tbs. cold unsalted butter, cut into small pieces 1 Tbs. finely chopped fresh dill

Preparation

Season the lamb chops all over with 1-1/2 tsp. salt and 1/2 tsp. pepper. Heat the oil in a large skillet over medium-high heat. 

Put 2 of the chops in the skillet and cook, flipping once, until deep golden-brown and medium rare (130°F), about 10 minutes. 

Transfer to a large plate, cover loosely with foil, and keep warm. Repeat with the remaining 2 chops.

Add the shallots to the skillet and cook, stirring, until softened, about 1 minute. 

Add the broth and wine and cook, scraping up any browned bits, until reduced by half, 4 to 5 minutes. 

Reduce the heat to medium low, stir in the mustard and lemon juice, and cook for 1 minute more. 

Add the butter a piece or two at a time, swirling the skillet to melt it into the sauce. Remove the skillet from the heat and stir in the dill. Season to taste with salt and pepper. 

Serve the lamb with the sauce.

The lamb and sauce pack a lot of flavor; keep the side simple with Basic Roasted Green Beans

Emergency Kimchi - Maangachi

Friday, November 12, 2021

Ingredients:

  •  Cabbage, 
  • kosher salt, 
  • hot pepper flakes, 
  • fish sauce, 
  • sugar, 
  • garlic, 
  • green onions, and carrot. 

Directions 1. 


  • Cut 2 pounds of cabbage into thin strips about 2-3 inches in length and ¼ inch wide. Place into a large bowl. 

  • 2. Add 1 cup cold water and ¼ cup kosher salt. Mix it well with your hands to properly salt the cabbage. 

  • 3. Set aside for 10 minutes. 

  • 4. Make kimchi paste by mixing these ingredients in a bowl: ⅓ cup hot pepper flakes, 1 tbs sugar, ¼ cup fish sauce, ¼ cup minced garlic, 3-4 stalks of
     chopped green onion (⅓ cup worth), ¼ cup’s worth of julienned carrot 

  • 5. Wash and rinse the salted cabbage in cold water a couple of times. Drain the water.

    6. Mix the kimchi paste into the cabbage thoroughly.

    7. Put the kimchi into a container, jar, or plastic bag.

    8. Press the top of the kimchi down with your hands to protect your kimchi from being exposed to too much air.

    9. You can eat it right away, just like salad. Or keep it at room temperature and it will ferment in a few days. Fermented kimchi can be used for kimchi stir-fried rice or kimchi stew, and it will be delicious.

karele ki kurkuri bhujia

Sunday, October 17, 2021


There are a few simple things that can bring as much joy as some kurkuri bhujia served with dal chawal or khichdi. But you won't understand if you haven't had bhujia ever, you might end up thinking the hand cut potato fries are the best kind of fried veggies.

While I love the nice hand cut potato fry especially if it comes with a generous sprinkling of herbed salt, the potato fry is not my favourite. I vote for bitter gourd fry or crisp karele ki bhujia. You have to try this kerele ki bhujia to know what I mean.

The other day I was at the neighborhood salon to get my pedicure, and the lady next to my chair was talking about how the kids these days don't want to eat vegetables. The pedicurist started grinning when I asked the lady ow much vegetables the adults in her family ate, to which she admitted they eat minimal vegetables but wanted their kids to eat more. The problem starts at the root obviously.

Then I got curious what this 20 something pedicurist eats as he works almost 10 hours a day and all such boys live on their own as they have migrated to big cities for work. I asked him and he said he cooks his food twice a day and that is paratha bhujia in the morning and dal chawal bhujia or dal chawal chokha for dinner when he reaches home. I can't tell you how happy I felt to hear this.

Anyone who cooks everyday and enjoys cooking as a de-stressing activity has my heart.

It reminded me of a few lovely people on Instagram who have been asking for my bhujia recipe they see with my khichdi or dal chawal. Some of them point out that it's always either karele ki bhujia or bhindi ki bhujia with my dal chawal meals.


Yes I love my karele ki bhujia a lot. As much as I love the karele ka chokha.

Karele ki bhujia is the simplest thing to make but you need some patience as it demands slow cooking. The good thing is that it doesn't demand much chopping and there is no peeling involved. The cooking is done by just stirring the bhujia a few times while it is on lowest possible flame of your gas stove.

ingredients 

300 gm bitter gourds (karele)
2 tbsp mustard oil
1/2 tsp turmeric powder
1/2 tsp red chili powder or a little more
1/2 tsp amchoor powder
salt to taste (1/2 tsp and little more to adjust if needed)


preparation 

Clean the gourds, remove the stalk, cut into 2 inch pieces and halve eac pice longitudinally. Then slice into thin strips of 5 mm thickness.

Heat mustard oil and tip in the karela slices along with salt. Stir to mix and spread the slices evenly in the pan so they crisp up for about 5 minutes on lowest possible flame.

Stir and arrange in an even layer again to make them brownish all over. Once you get the desired colour and crispness you add all the powdered spices, cook for a minute and take off the stove.

Serve hot with dal chawal meals or parathas and bless the bhujia. You would satart loving karela after eating this bhujia trust me.

Gulkand - Rose Sugar Jam

 How to make Gulkand? 

_____________________________

There are only 2 ingredients needed to make Gulkand. 

Rose petals and sugar. 

The quantity of rose petals and sugar is equal by weight so sugar helps preserve the rose petals along with their essential oils.

gulkand recipe

We need the heirloom (desi) variety of rose known as Damask rose. This variety has very soft delicate petals and a lingering fragrance. The flowers can be multi-whorled or single whorled depending on where they are growing, pruning pattern, sun exposure and climate.

In the states of Uttarakhand and lower Himalayas the Damask rose grows wild by the roadsides and comes in huge bunches. The rosehips from those roses are the best.

Deep pink variety of Damask rose is preferred over the light pink rose to make Gulkand or rose petal jam.

Once you have the roses, better get them from a chemical free source, I collected them over a week when my garden was benevolent a couple of years ago, just separate the petals and rinse them lightly under running water. Spread the petals over a muslin cloth in shade so the water evaporates.

The older method warrants crushing of rose petals in mortar and pestle slowly but I use a mixie blender whenever I have a good quantity of rose petals to preserve. It takes just a couple of seconds for a batch and the mixture doesn't get heated. Heating the mix would result in the loss of the aroma.

To make fresh gulkand from a couple of roses within a day I just crush them along with sugar, keep in a glass jar and expose to sun for a day. 

Here is how it looks when rose petals and sugar are crushed lightly in a mixie blender. You can use a food processor and even a chopper.

gulkand recipe
 
After crushing them together coarsely, just transfer to a sterile (clean and dry) glass jar with a tight fitting lid and keep indoors at room temperature, away from sun to preserve the colour.

The gulkand stays well for years but the colour gets darker as you can see from the pictures of freshly made gulkand above and the 2 year old batch in the picture with Gulkand phirni.

gulkand recipe

And don't worry about the high sugar content of gulkand. It is never used as a jam spread but always as a rose flavour to be added to desserts so the sugar gets balanced.

Damask roses

Damask roses traveled from Persia to Europe, the name of the rose comes from Damascus Syria. I am not sure how these roses came to India but now they are called as Indian desi gulab. It might have come to India via older trade routes as there has been a considerable exchange of such commodities between the middle east and India.

I will update this post if I get any information about how Damask roses came to India. Please share if you know anything about that.

Damask roses

Till then, make some Gulkand whenever you get a few Damask roses or desi gulab. You will be hooked to make this rose petal jam that doesn't need any cooking.

And the gulkand phirni will be a preferred dessert at home I must tell you. The real ingredients have the taste, the chemical essences just fool our senses and sometime kill them too. Please don't let that happen. 

Aloo aur harey pyaz ki subzi..


.

Aloo aur harey pyaz ki subzi

Aloo aur hare pyaz ki subzi has been frequent winter subzi in my kitchen and the recipe has not changed ever since I started cooking it. It is actually the exact same recipe as my mother used to cook and we both love it immensely. Hara pyaz is the same spring onions we get fresh in the markets as soon as the winters start in North India. This is one green leafy vegetable that is always there in my fridge. More so in recent times when the husband has started carrying a lunch box to office. He loves aloo aur hare pyaz ki subzi and it gets ready within 10 minutes, doesn't make the lunch box messy with a gravy and tastes great even when cold. What more I would wish for? Oh and it makes a standalone breakfast dish for me sometimes, may be with a boiled egg on the side. Yes, potatoes and eggs, both are life savers.

ingredients...

boiled potatoes 2 large (it should be 1.5 cup when cubed)
roughly diced tomatoes 1 cup
chopped green parts of spring onion 3 cups
finely chopped ginger 1 tbsp or more
finely chopped green chilies 1 tsp
turmeric powder 1 tsp
cumin seeds 2 tsp
black pepper powder 1 tsp
salt to taste
mustard oil 1 tbsp or a bit more

Aloo aur harey pyaz ki subzi
procedure...

It is great if you have boiled potatoes in the fridge, otherwise just boil them in the microwave or whatever way you prefer. Cold boiled potatoes are suited for this recipe best, but you can go ahead with freshly boiled potatoes as well.

Heat the oil in a pan and tip in the cumin seeds, wait till they crackle. Then add the chopped ginger and green chilies  wait till they are fried but not dehydrated, add the cubed potatoes, turmeric powder and salt at once. Mix well and stir fry till the potatoes are coated well and slightly pinkish at the edges.

Add the diced tomatoes, mix and cook till they get mushy, it takes about 2-3 minutes.

Add the pepper powder and chopped greens of spring onions and just stir and cook till the greens get wilted and mixed well with the potatoes. Looking like the picture.

Do not cook after adding the greens for more than a couple of minutes.

Aloo aur harey pyaz ki subzi

You might like to add a pinch of amchoor powder in this stir fry or sookhi subzi. Or may be some red chilly powder too sometimes. Adjust seasoning when the subzi is still in the stove and mix well.

Serve hot or cold, the subzi tastes great with just anything. As sandwich stuffing, as a paratha stuffing or just as it is like I do. Make it spicier and it suits a plain daal chawal or khichdi meals well, just with a side of a raita or nothing I say.

Simple home cooked meals are very much doable on a daily basis. Stop eating your lunch in the office canteen and ordering your diner every day. Would you?